
Quick Answer
Most custom tin box projects follow eight main stages:
- Project and quotation review
- Structure and tooling confirmation
- Artwork and dieline preparation
- Proofing and color approval
- Tinplate printing and coating
- Sheet slitting and component cutting
- Stamping, forming, assembly, and inspection
- Protective packing and shipment
The process is not identical for every tin. A simple three-piece tin may require fewer operations, while a complex structure with hinges, windows, handles, embossing, plug lids, or special closures may require additional tooling and assembly steps.
Manufacturing Process Overview
A typical custom tin packaging project moves from commercial review to technical confirmation before production begins.
During the early stages, the factory checks whether the requested size, shape, structure, printing process, quantity, and delivery plan are practical. Once the structure and artwork are confirmed, the project moves into proofing, printing, cutting, forming, assembly, inspection, and packing.
The number of operations varies by product. However, the basic production logic remains the same: flat printed tinplate is converted into separate metal components, and those components are then formed and assembled into the final package.
1. What Information Is Needed Before Quotation?
To review a custom tin project efficiently, the factory normally needs at least the following information:
- Required size
- Tin shape
- Order quantity
- Number of artwork designs
- Intended product use
- Printing requirements
- Destination country or market
These details affect tooling, printing layout, material selection, packing, and delivery planning.
The sales or quotation team first performs a preliminary feasibility review. Projects involving new tooling, unusual structures, special accessories, or less common production processes are also reviewed by technical personnel before a final quotation is prepared.
The purpose of this early review is not only to calculate price. It is also to determine whether the requested product can be manufactured reliably.
Existing tooling or new tooling?
HYTINPACK has more than 1,000 sets of tooling for common round, square, rectangular, oval, heart-shaped, and other conventional tin structures.
If the customer can accept an existing size and structure, using existing tooling is normally the faster and more economical option.
New tooling is required when the dimensions or structure must match a specific requirement that cannot be met by existing tooling.
For a detailed explanation, read about existing and new tin box tooling.
Printing quantity and production planning
Tinplate printing quantities must be evaluated by printed sheets rather than finished tins.
For a dedicated offset-printing run, the practical printing minimum is commonly approximately 1,500 tinplate sheets. One sheet may contain several lids, bodies, bottoms, or other components, so 1,500 sheets does not mean 1,500 finished tins.
Gang-run printing may be considered for some smaller orders, often around 3,000 to 5,000 finished tins, when the artwork, coating, color, sheet layout, and production timing are compatible with other projects. The purpose is to distribute the minimum printing cost and provide a more economical quotation.
For smaller quantities based on suitable stock tins, screen printing or UV printing may be more practical because they can avoid a dedicated full-sheet offset-printing run.
Read more about why 3,000 pieces is a common starting MOQ and compare offset, screen, and UV printing methods.
2. Structure and Artwork Confirmation
After the size and structure are confirmed, the factory provides a dieline or artwork template.
Customers normally prepare the design directly on this template. Common accepted working formats include editable AI, PDF, PSD, or other suitable vector-based production files.
Before printing, the artwork is checked for production-related details such as:
- Bleed
- Text safety margins
- Body seam position
- Rolled-edge areas
- Stamping and drawing zones
- Color mode
- Barcode size and placement
- Embossing or debossing position
- Alignment between separate tin components
Artwork that looks correct on a flat computer screen may change after cutting, rolling, stamping, drawing, or assembly. Important logos, text, faces, barcodes, and other critical elements should therefore be kept away from seams, rolled edges, deep curves, and heavily formed areas.
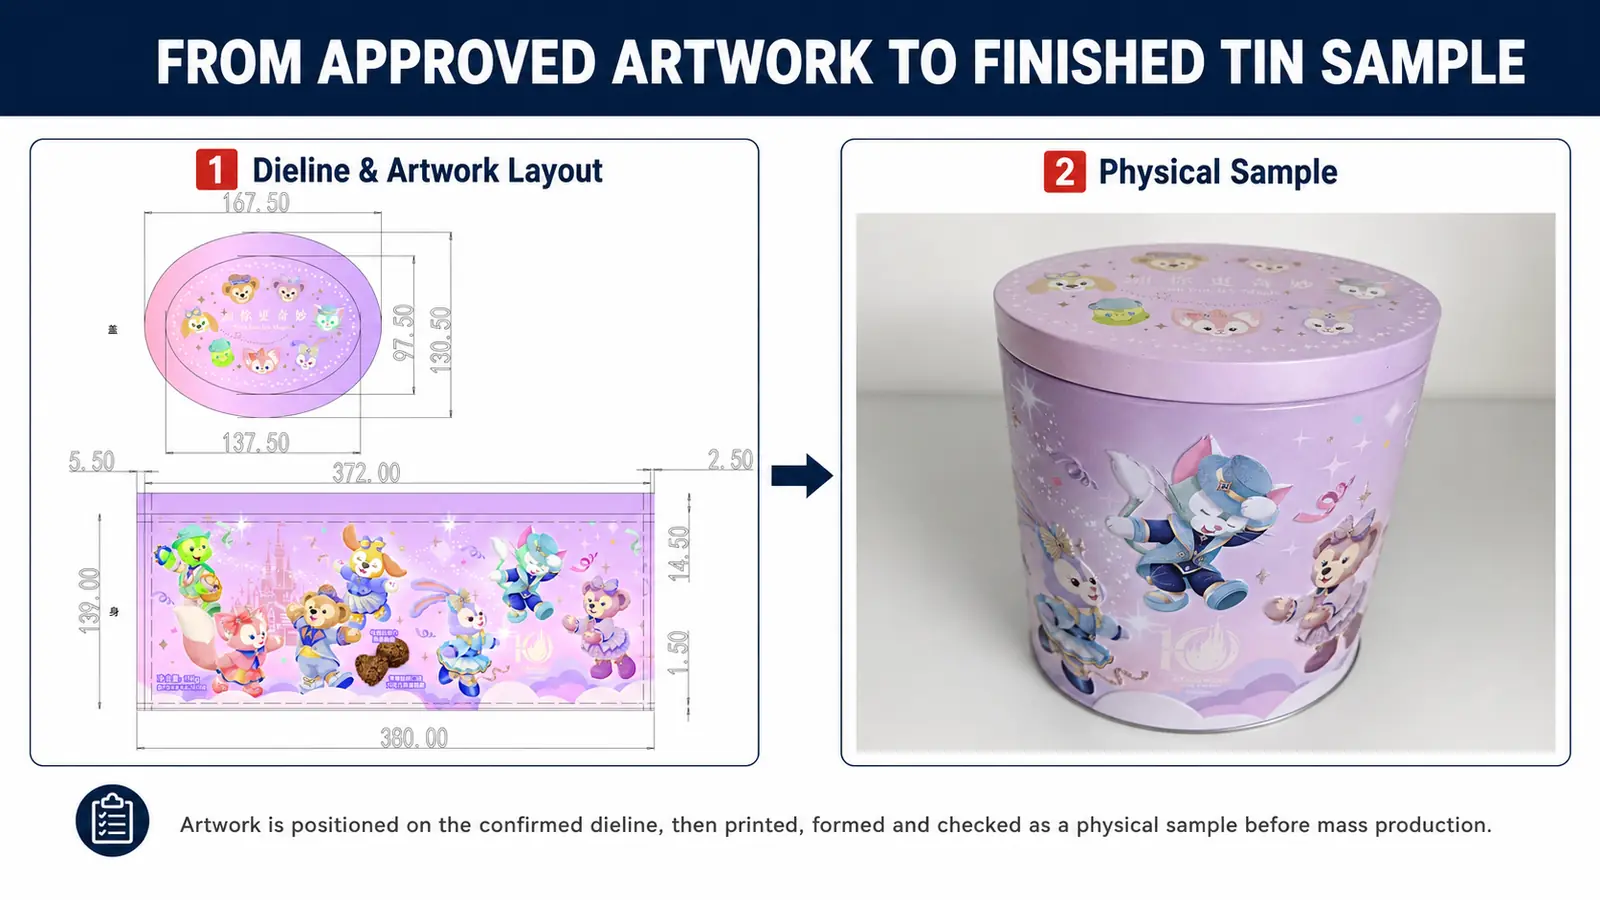
How can buyers preview the finished tin?
A complete physical tin usually requires tooling and production sampling. However, several preliminary review methods may be available:
- A 3D rendering for a new design or new structure
- A digital paper proof for an approximate color and layout review
- A tooling or plain-metal sample for structural confirmation
- A printed production sample for final appearance review
A paper proof is useful for checking general color direction and artwork placement, but it cannot fully reproduce the metallic surface, white undercoat, transparent-metal effect, varnish, embossing, or final formed appearance of printed tinplate.
3. Proofing and Color Approval
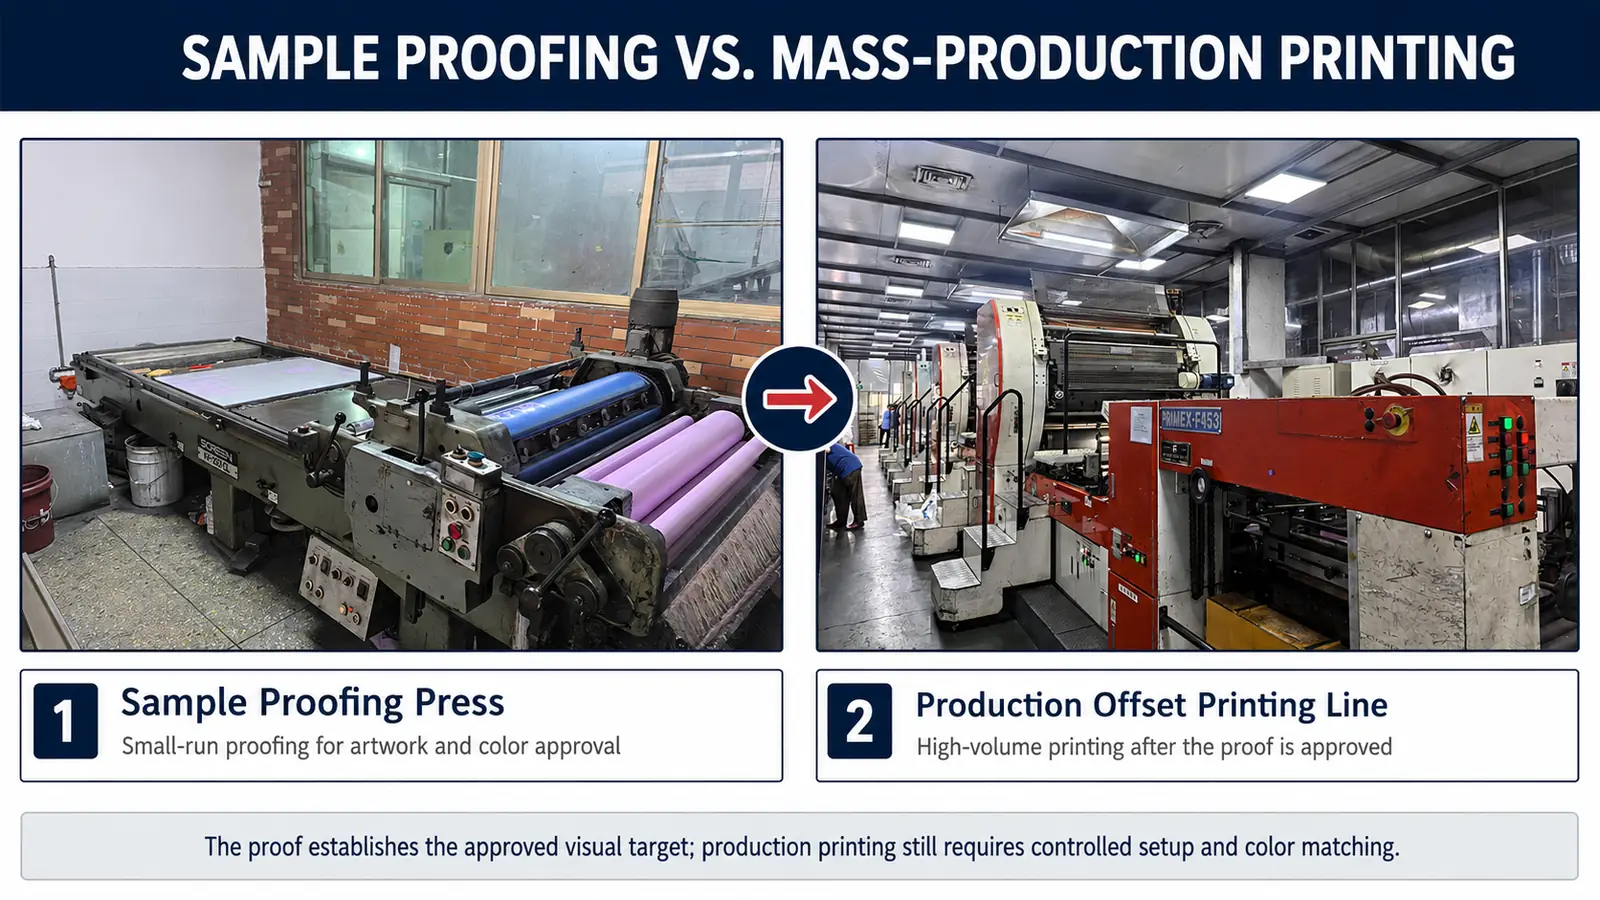
Before mass printing, the factory normally prepares a printed proof for customer approval.
The proof allows the customer to review:
- Overall color direction
- Artwork position
- Text and barcode clarity
- Spot colors
- White undercoat or transparent-metal effects
- Gloss, matte, or other coating requirements
- The relationship between artwork and formed areas
Once the printed proof is approved, the mass-production printing run can be arranged.
Pantone and CMYK
Pantone spot colors are printed as individually prepared colors. They are often selected for brand colors, solid areas, and applications that require strong visual consistency.
CMYK produces color through combinations of cyan, magenta, yellow, and black halftone dots. It is suitable for photographs, gradients, illustrations, and complex full-color artwork.
The final process may combine white ink or a white base coat, CMYK, spot colors, and a protective surface varnish.
Why can color vary between proofing and production?
Reasonable color variation can occur between a printed proof and mass production because the two stages use different equipment and operating conditions.
Proofing is normally completed on a smaller proofing press. Colors may be applied separately, and the printing pressure is lower.
Mass production uses larger two-color or four-color equipment with different pressure, speed, drying, and production conditions.
Reasonable differences may also occur between separate production batches. Tinplate printing still requires experienced operator adjustment and is not controlled only by entering a fixed group of machine parameters.
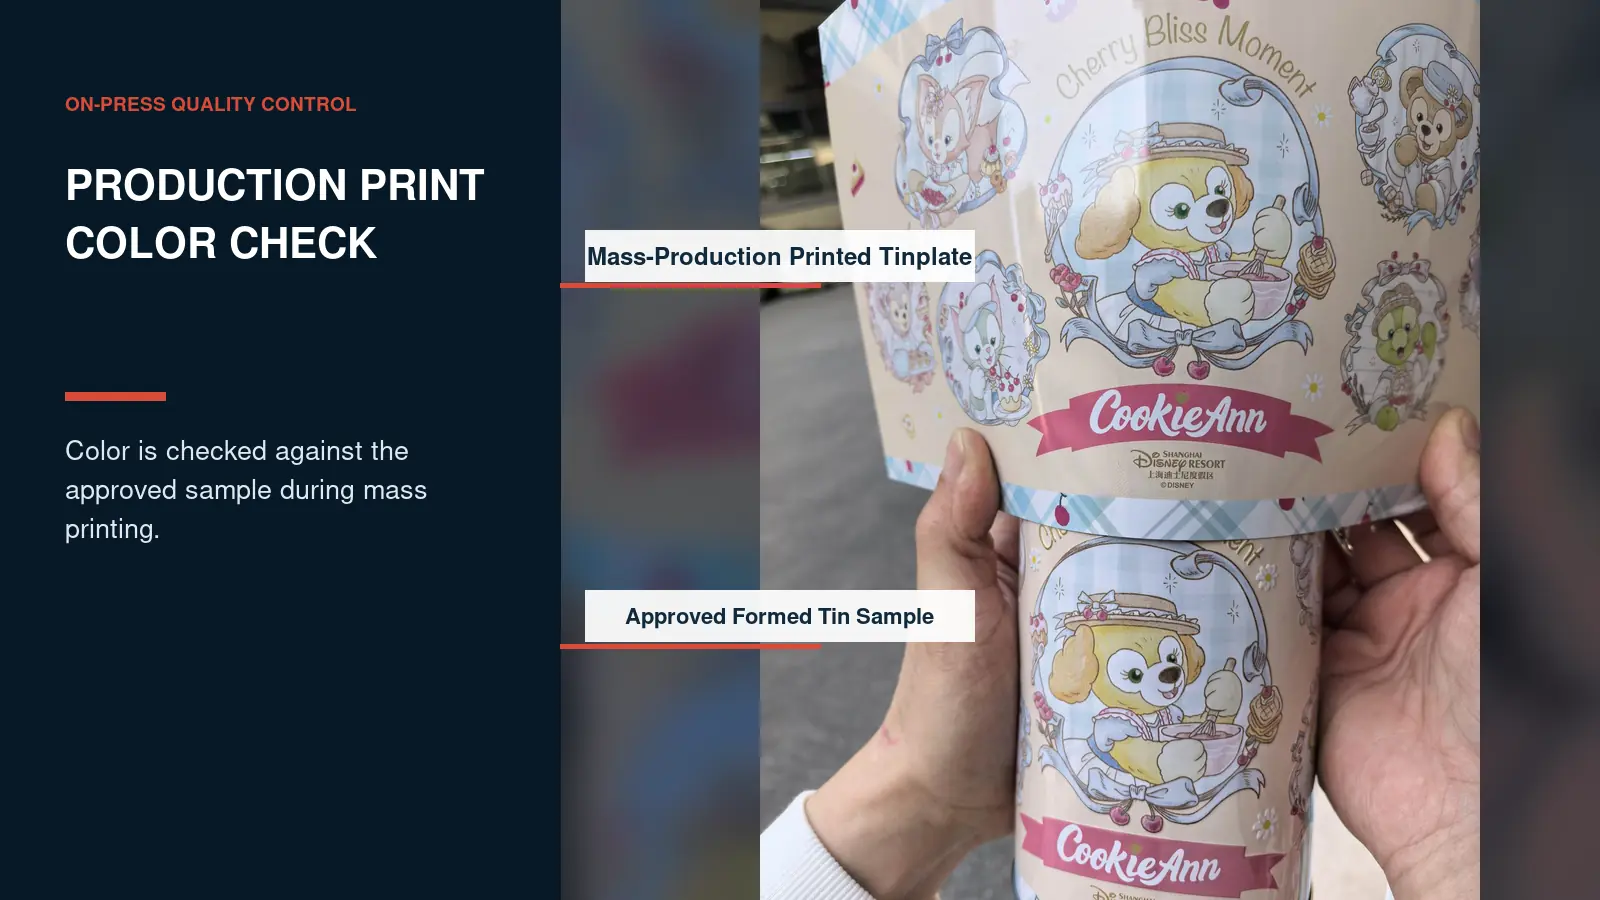
This does not mean that color control is ignored. The approved proof is used as the production reference, but buyers should understand that industrial tinplate printing cannot guarantee zero color difference.
4. Tinplate Printing and Coating
Before printing, the tinplate is checked to confirm that its thickness, temper, and surface condition are suitable for the intended structure and forming process.
A conventional decorative printing sequence may include:
- White ink or a white base coat
- CMYK or spot-color printing
- Gloss, matte, or another specified protective varnish
A transparent-metal effect may omit the white base in selected areas, allowing the metallic tinplate appearance to remain visible through the printed colors.
Each ink or coating layer must be applied and dried according to the production process. Layers cannot simply be printed together without the required curing or oven-drying stages.
After printing, the production team checks for issues such as:
- Color difference
- Registration
- Scratches
- Ink spots
- Missing print
- Oven dust or contamination
- Uneven ink or coating coverage
Materials, inks, and coatings must be selected according to the intended product use and applicable project requirements. If specific food-contact documentation or destination-market compliance is required, buyers should provide those requirements before quotation and material confirmation.
5. From a Printed Tinplate Sheet to Individual Components
For conventional offset-printed tins, decoration is completed while the tinplate is still flat.
A full printed sheet may contain multiple repetitions of:
- Lids
- Bodies
- Bottoms
- Side panels
- Internal components
- Other structural parts
After printing, the sheet is slit and cut according to the production layout. Each component is separated before being transferred to the appropriate forming operation.
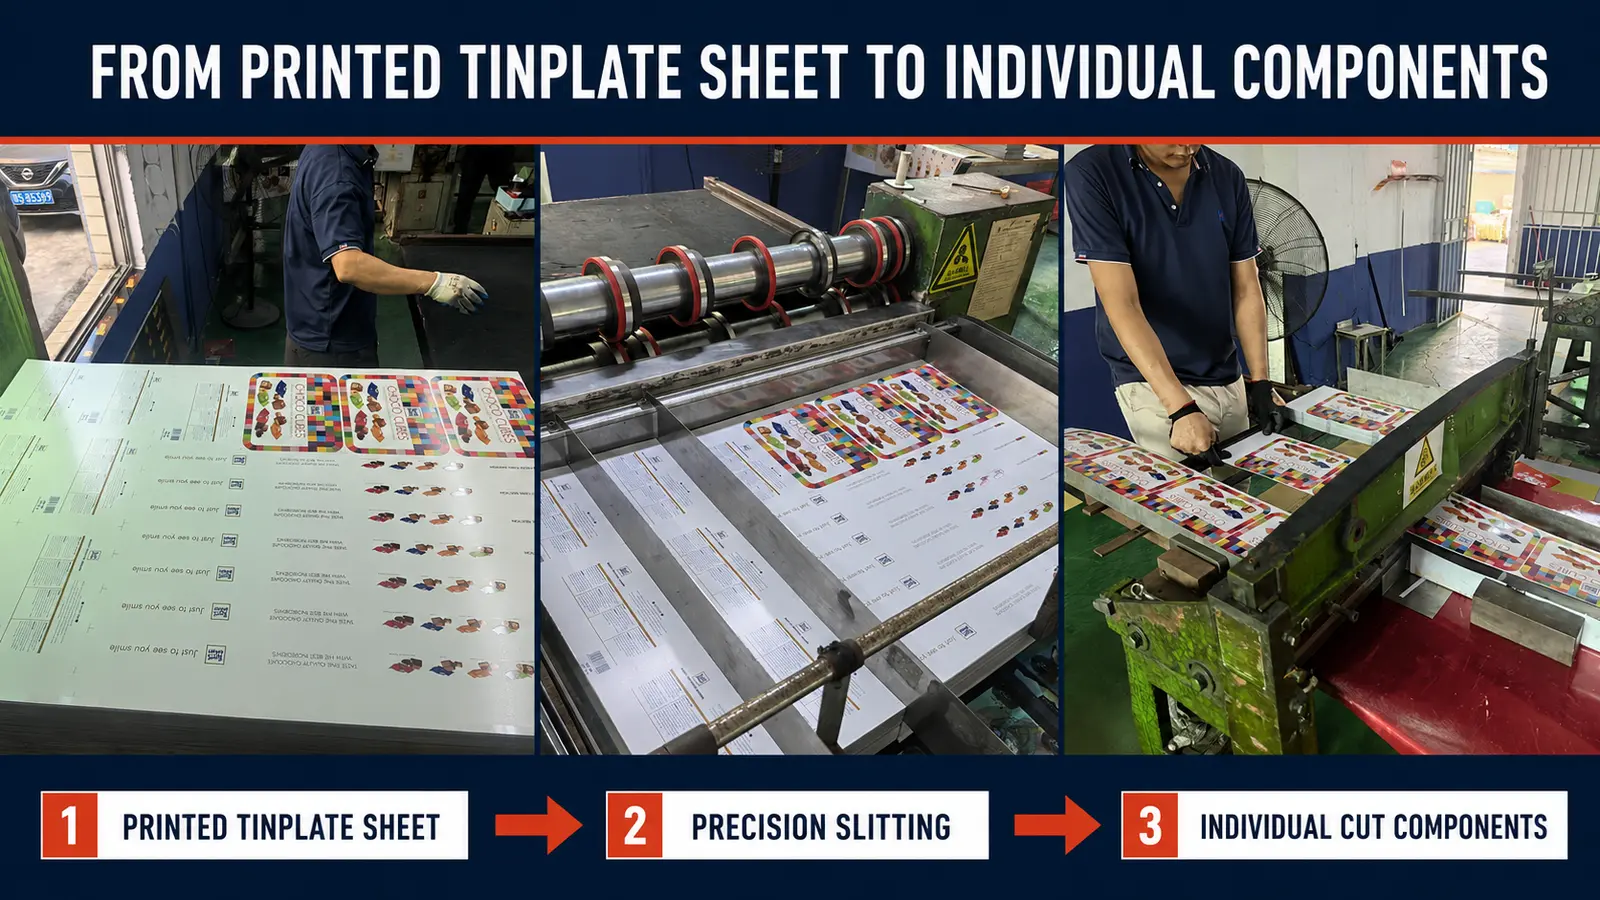
Important terminology: The final stage shown in this image is individual cut components or component blanks, not finished tins. These flat components still require stamping, forming, rolling, joining, or assembly.
6. Stamping and Forming
A conventional three-piece tin commonly consists of:
- Lid
- Body
- Bottom
Some drawn tins use two main pieces, while complex tins may contain additional structural components and accessories.
Each printed component is transferred to its corresponding tooling and production operation.
Common body-forming or joining methods include:
- Mechanical side seaming
- Welding
- Drawing
- Other structure-specific methods
Lids and bottoms are stamped, rolled, curled, or assembled separately before they are joined with the body.
A tin box rarely requires only one press operation. A simple structure may use several tooling stages, while a complex product may require many separate stamping and forming operations.
The difference between production routes is mainly the number and type of operations required by the structure.
Every order requires tooling to be installed and adjusted for production. This setup work helps explain why small orders usually have a higher labor and machine-setup cost per piece than larger production runs.
7. Assembly and In-Process Inspection
Hinges, plug-lid components, transparent windows, handles, locks, and other accessories may require separate tooling or assembly operations.
Some operations are completed by press tooling, while others require manual assistance.
During forming and assembly, the production team checks for:
- Scratches
- Dents
- Deformation
- Improper rolling
- Poor component fit
- Incorrect opening or closing
- Visible printing damage
Production lines normally include inspection during manufacturing as well as a final check near the end of the line.
8. Finished-Tin Inspection
Typical finished-product inspection items include:
- Dimensions
- Opening and closing
- Lid and body fit
- Rolled or curled edges
- Appearance
- Printing
- Cleanliness
- Packing quantity
Drop testing is not a standard test for every empty tin order. If a customer requires a specific drop-test condition, transport test, or finished retail-packaging test, it should be confirmed separately before production so that appropriate packaging can be developed.
Are seamed tins completely airtight?
Mechanically seamed tin boxes are not normally considered completely airtight.
For products that require moisture or barrier protection, an inner bag, sealed pouch, liner, or other primary packaging is generally recommended.
Direct food contact may be possible when the selected material, internal coating, ink system, product use, and applicable requirements have been confirmed for the project. The tin itself should not automatically be presented as a substitute for a hermetic primary barrier.
9. Protective Packing and Shipment
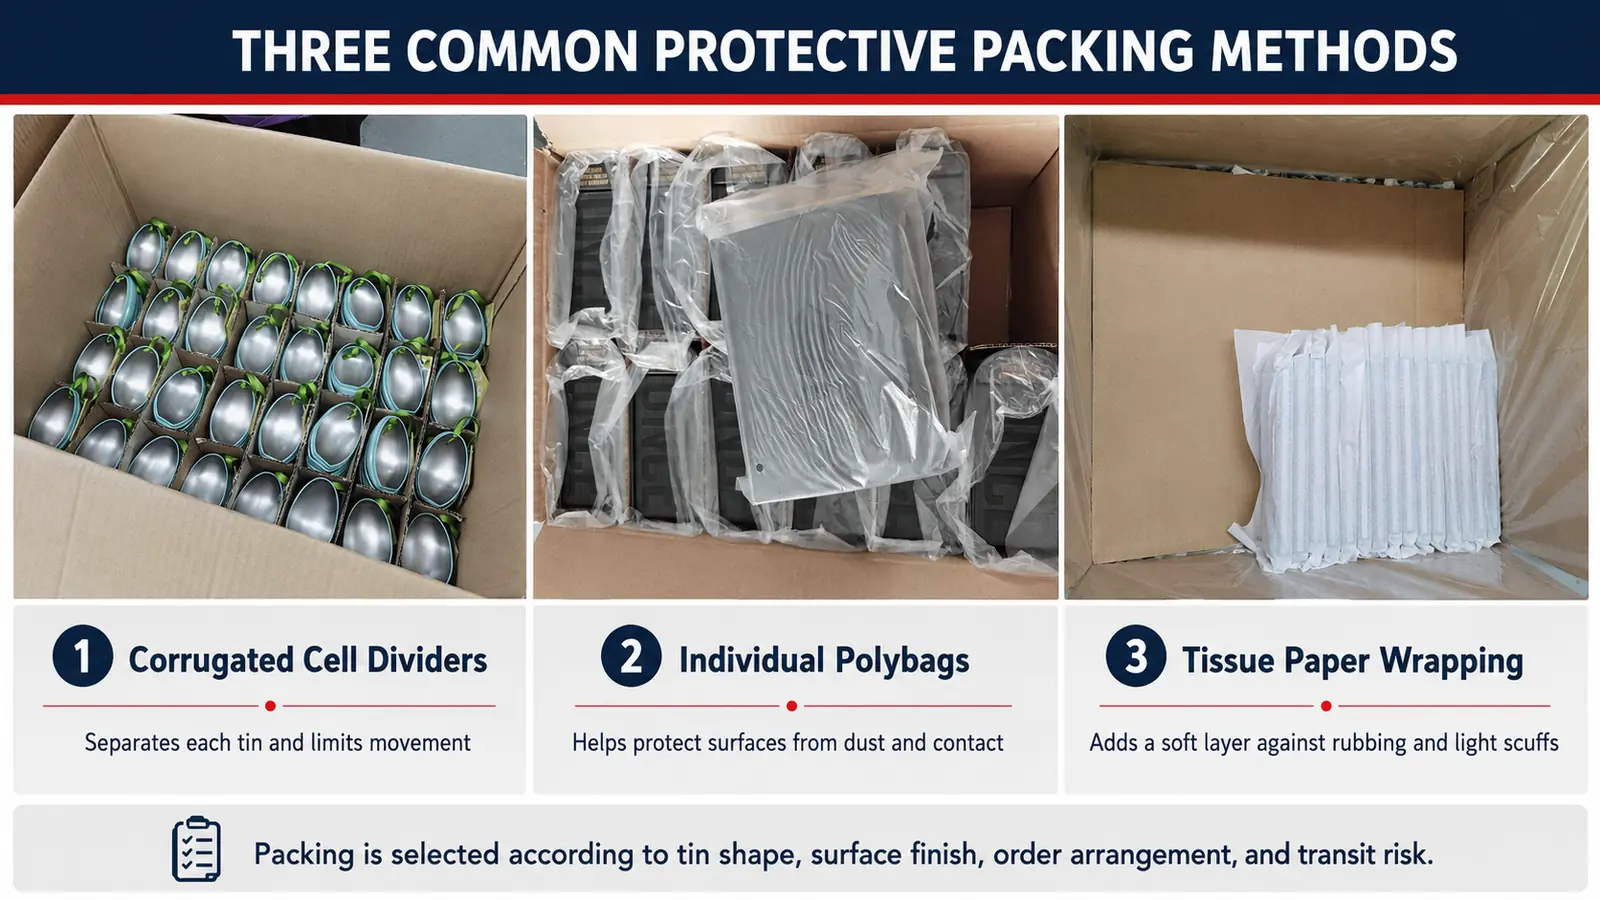
Tin boxes normally require protection against scratching, rubbing, denting, and deformation during transportation.
Common protective packing methods include:
- Polybags
- Tissue paper
- Cardboard dividers
- Controlled nesting
- Individual wrapping or packing
Depending on the tin structure and customer requirements, additional protection may include:
- Egg-crate partitions
- Blister trays
- Foam
- Individual color boxes
- Custom inserts
Outer-carton information and shipping marks are normally printed according to the customer's instructions.
After packing, the production team performs quantity checks before shipment.
10. Typical Production Timeline
For a conventional order using existing tooling, the period from final artwork approval to shipment is commonly approximately 30 to 40 days.
This is a general production reference, not a guaranteed schedule for every project.
The actual lead time depends on:
- Order quantity
- Number of designs
- Printing arrangement
- Structure complexity
- Accessories
- Proof approval
- Packing method
- Production capacity
- Destination and shipping plan
A project requiring new tooling normally needs additional time. Conventional new tooling may require approximately one month, including tooling trials and sample preparation. More complex tooling must be evaluated separately.
The production schedule should therefore be confirmed for each order instead of relying only on a general website estimate.
11. What Buyers Should Prepare
Before requesting a detailed quotation or production review, buyers should prepare:
- Preferred tin size or product capacity
- Shape
- Target quantity
- Number of artwork designs
- Product use
- Required lid and bottom structure
- Printing and coating requirements
- Accessories
- Packing requirements
- Destination country
- Required delivery date
- Any compliance or testing requirements
Providing these details early allows the sales and technical teams to identify unsuitable specifications before artwork, tooling, or printing costs are committed.
Practical Recommendations
- Confirm size and structure before completing final artwork.
The design template depends on the final dimensions, lid, body, bottom, seams, and formed areas. - Treat a paper proof as an artwork and color-direction reference.
It cannot reproduce every metallic, coating, embossing, or forming effect. - Approve the printed proof carefully.
It becomes the main reference for mass-production printing. - Distinguish tinplate sheets from finished tins.
A printing minimum expressed in sheets cannot be converted directly into the same number of finished tins. - Confirm barrier requirements separately.
A decorative tin box is not automatically airtight or moisture-proof. - Provide testing and destination-market requirements before quotation.
Late changes may affect materials, cost, production time, and packing. - Allow sufficient time for new tooling.
Tooling trials, structural adjustment, sample confirmation, and artwork preparation must be completed before mass production.
PROJECT REVIEW
Planning a Custom Tin Packaging Project?
Send us your required size, shape, target quantity, number of designs, product use, printing requirements, packing method, destination country, and delivery schedule. Our team will review the manufacturing requirements and recommend a practical production route.
Request a Manufacturing ReviewContent Review
Written by the HYTINPACK Editorial Team
Technically reviewed by the HYTINPACK Production Team
Dongguan Huaiyang Metal Manufacture Co., Ltd.
This guide provides general manufacturing guidance. Final production feasibility, quality requirements, timing, and compliance details must be confirmed for the specific project.
